Saturday, November 30, 2013

I did my sister's makeup again! ♥

She attended a wedding again earlier this day and she asked me to do her makeup. I didn't have any idea on what makeup to do on her, so I asked her what she wants. She asked me to do a peachy and gold look that suits her dress.

Here's the completed look:

For the face, I didn't put any primer on since I used BB Cream. I know I shouldn't apply BB Cream because it has spf and is not very friendly to flash photography, but that's what she wants. This BB Cream is one of my favorites as well because it gives life to your skin and is not cakey at all.

All products I used on her face is very much affordable and mostly drugstore makeup.


Product List:

Face:

The Face Shop Power Perfection BB Cream
The Face Shop Lovely Me-Ex Stick Concealer
Benefit Hoola Bronzer
Careline Oil-Control Blush On in Peach Glow
K-Palette Zero Teka Mat Powder
E.L.F. Essential Flawless Eyeshadow in Beautiful Brown (Lid; for nose contour)

Brows:

Nichido Mineral/Precise Eye Pencil in Copper
E.L.F. Wet Gloss Lash & Brow Clear Mascara

Eyes:

E.L.F. Eyelid Primer and Line Sealer
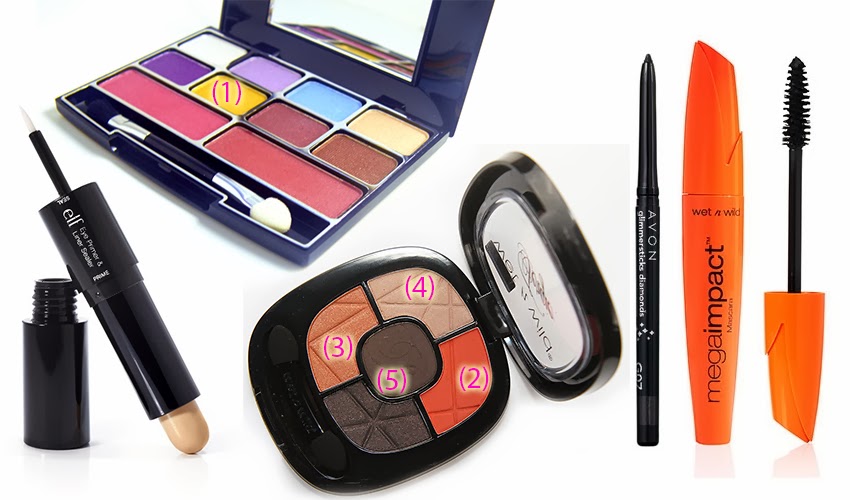
Nichido Eyeshadow Palette
- (1) Gold e/s: Center of the lids
Wet 'n Wild Fergie Centerstage Photo Op Eyeshadow Palette in Dessert Festival
- (2) Matte Peach e/s: Transition Color
- (3) Shimmery Copper e/s: Crease
- (4) Matte Brown e/s: Outer V
- (5) Shimmery Cream e/s: Browbone & inner eye highlight
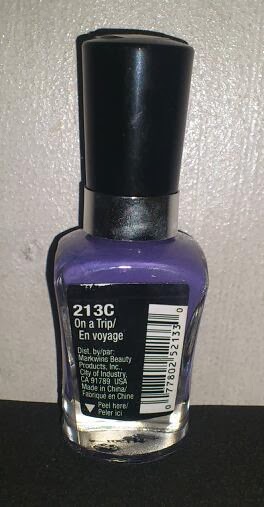
Avon Brown Retractable Eyeliner
Wet 'n Wild Mega Impact Mascara


Lips:
Revlon Just Bitten Kissable Balm Stain in Lovesick

That is the full list of makeup products I used on my sister. This is another simple and elegant makeup for a wedding ceremonial. I hope you like it.


Wednesday, November 27, 2013

Recreating A Holiday Glam Look ♥

I was searching for a good makeup school, randomly clicking for links and saw Muriel Vega Perez' page in PAC Philippines. Then, I saw this:

He's having a giveaway on his FB page and I wanted to join, so I have to recreate this look:

I don't really have colored eyeshadows, so I struggled in mix and matching colors to recreate this look. It took me more than an hour to do this. Since I am not a pro in applying makeup, it took a lot of time and effort. But that being said, here's what I came up with:


I know it's not exactly copied, but I know I tried my best. I worked with the makeup and brushes that I have to the best of my abilities. Also, I don't even own a bright orange eyeshadow and a nude lipstick. But I did enjoy recreating this look. 

I also encourage you to join his giveaway! Go ahead and recreate the look now. :)


Monday, November 25, 2013

DIY Eyelid Primer + Review ♥

Since my current eyelid primer from e.l.f. is almost done, I searched for DIY eyelid primers and saw a lot. I tried and tested out different DIY to see which is more effective. I copied and tweaked some ingredients, so I came up with this.


Eyelid primers' main use is to make eyeshadows more opaque, to lessen or to refrain the eyeshadows from creasing, and to make the pigments last longer.
The price of each primers depends on the brand, of course but sometimes even expensive primers are not that effective, so why not just make your own! I have ingredients I used in my beauty collection so I didn't spend at all.

Products needed:
Facial Moisturizer (Optional)
Aloe Vera Gel ( Main Ingredient; dupe: body butter)
Any foundation desired
Any face makeup with Glycerin (Glycerin helps in the longevity)
Container (I prefer squeezable container or same as an eyelid primer container)
Spatula (for mixing)
You just basically mix one part of each ingredient together and voila! You have your own DIY Eyelid Primer.

So I have compared the DIY Primer with my e.l.f. eyelid primer, which is a great dupe for the Urban Decay primer potion. As you can see the DIY primer made the purple eyeshadow bolder than the others.
Left: e.l.f. eyelid primer, Center: DIY Primer, Right: no primer
Time: 10:50pm
As for the longevity of the primer, the DIY primer holds the pigment longer than the others. The shadow is still opaque and very bold.
Time: 11:14pm
Time: 2:04am
I hope you enjoyed this DIY project! I just want to share what I have discovered. :)


Sunday, November 24, 2013

Step it up with a bright lips ♥ Makeup of the Day (11/24/13) ♥

I didn't had much time to put on makeup and I didn't want to put on a lot as well. So after I moisturized my face, I just concealed my under eye circles with my favorite Garnier BB Roll On and put on my unfavorite Myra-E Tinted Moisturizer all over the face up to the neck area. After so, I applied Sephora Cream Blush in Rose Glow and contoured a bit with Benefit Hoola Bronzer. Then set it all in with Careline Oil-Control Powder in Tan.

For the eyes I just kept it simple with just a mascara. I used Wet 'n Wild Mega Protein Mascara. I didn't defined my brows today because I was supposed to go to Lay Bare to have it thread but the line was too long.

Then for the lips, I moisturized it first with Maybelline Baby Lips in Mixed Berries and top it off with Wet 'n Wild Mega Last Lip Color in Red Velvet. It's not my go to lipstick and I'm not really a fan of a bright red lips. I just tried it out because bright lips makes your look made up.

Here's my simple look of the day with just a pop of bright lips:

PS: I will be posting makeup of the day every weekend. I hope you like it! :)


Saturday, November 23, 2013

Peach in my Heart ♥ Makeup of the day (11/23/13) ♥

I know it's too early to blog about my makeup of the day but I woke up at 5am and decided to do this for you beautiful people. :)

Today, I want to get out of my box and tried using orange and peachy tones in my makeup. I'm not a fan of the color orange in general, but today I pulled out my orange eye shadow palette, peach blush and my orange-toned lipstick.

Clean and Moisturized Face

For face makeup, I used Careline Oil-control Liquid Makeup. I don't like it that much but I'm just trying to use it up so I won't waste my money. I used Garnier BB Eye Roll-on to conceal my under eye circles. I used this every single time I do my makeup since I bought it. I just love it. Then I set it all in with Maybelline All in One Clear Smooth Cake Foundation in Sand Beige. For a hint of rosy cheeks, I used Careline Oil Control Blush-on in Peach Glow, and contoured my face with my favorite Benefit Hoola Bronzer. If you know any good bronzer, please do comment it down below because I want to try out other bronzers. :)

For the brows, I just lightly fill them in with Careline Color Pencil in Brown and set them with Nichido Clear Brow Gel. I don't really like the Brow Gel from Nichido but I'm just trying to use it up to have the container for my upcoming DIY project. Be sure to watch out for that. :) I did clean up the brows with my Elianto concealer.

Defined right brow


For my eyes, I wasn't really sure how to use my Wet 'n Wild Fergie Centerstage Collection Photo Op Eyeshadow in Dessert Festival. I am no a fan of shimmery or glittery anything so I just played with the 2 matte shadows in the palette and just highlighted with the light shimmery one. The I just lined my lash line with San San Gel Eyeliner in Black, curled my lashes and apply coats of Wet 'n Wild Mega Protein Mascara. Not really a fan of this mascara but it conditions my lashes and I can see that it's healthier looking now.


For the lips, I just topped it off with Wet 'n Wild Silk Finish Lipstick in Sunset Peach. It's not really opaque; it is on the sheer side of lipstick and it is shimmery too but not in your face glittery one.


Here's my makeup of the day:


Wednesday, November 20, 2013

I did my sister's makeup for a wedding! ♥

This is not the first time I put on makeup on my sister. I also did her makeup on her company's anniversary earlier this year. This time I made sure everything is okay for flash photography and to make the makeup last long on her face. Since she's a bridesmaid in a morning wedding, I didn't do a dramatic eye look.

Before

After


First is priming her face with Maybelline Baby Skin Pore Eraser to minimize her pores and to lengthen the stay of the makeup to her face. To reduce her dark circles and some imperfections, I used Garnier BB Roll On. Then to even out the skin tone, I used San San Matte Finish Liquid Foundation. Since her skin tone is different than mine (I used some of my personal makeup. It's alright since she's my sister.), I blend it with the concealer to lighten the foundation. I used this foundation because it doesn't have spf that is not for flash photography and it stays matte.

Next is adding dimension to her face by contouring her cheek bones, temples, jaw line and nose bridge with Benefit Hoola Bronzer. For a naturally flushed cheek look, I applied Sephora Cream Blush in Rose Glow and pat on a little bit of the blush from ELF Blush and Contour Duo just to add a little bit of highlight. Then I mattify and set the face makeup with K Palette Zero Teka Oil Control Powder.

To frame her face, I defined her brows with Nichido Mineral Precise Eye Pencil in Copper. She doesn't want a bold eyebrows, so I just line under the brow and feather in the product to the gaps on her brows. Then I comb the brows to even out the product and set it in place with ELF Clear Brow Gel.


For the eyes, I used Urban Decay Naked 2 because it stays long than other eye shadows we have and it gives a good color payoff. Bu first I primed her eyes with ELF Eyelid Primer. Then I applied Tease all over the crease area as a transition color. For he lids, I pat on Bootycall. I added Half Baked on the center of her lids to pop on some gold. Lastly, I defined her outer v with Snakebite. And of course, I blend everything to remove harsh lines. To highlight he inner corner and brow bone, I swiped on Foxy, a matte light cream to have a contrast to all the shimmery eye shadows.

After that, I thinly lined her upper lash line with Wet 'n Wild Mega Last Defining Marker in Blackest Black and created a baby wing. After waiting a couple of minutes to set the eyeliner, I curled her lashes and apply coats of Wet 'n Wild Mega Impact Mascara in Very Black, which gave length and volume to her thin and short lashes.

For a bold lip that will match her red dress, I let her apply her favorite Wet 'n Wild Mega Last Liquid Lip Color in Red My Mind. And her look is complete. ♥


I love making beauty DIY. ♥

I do love making beauty DIY because first and foremost, it's cheaper than buying it in any stores. I can save a lot in doing DIY and I can also check the ingredients I use. I have some DIY videos or tutorials I already posted in my YouTube channel, but what I am excited about is what I just created minutes ago. I can't really post it right away because I'm still testing it out, so if there's something wrong with it I can tweak it before sharing it to all of you.


The first beauty DIY I made was about a setting spray/mist. I don't want to spend more than a thousand bucks for Skindinavia setting sprays or MAC Fix +. I searched the net for some diy for this and I encountered a lot. I searched where to find Glycerin here in the country but I cannot find one. Then I went to Landmark and found Aloe Vera gel, which makes a great ingredient for setting spray. In the video, I just added distilled water to the gel but you can also add vitamin e.
Instead of paying PHP1,500++, I just spent PHP200! :)


The next DIY I made was a tinted brow gel, which I had 2 trials to made it right. The first trial I did was a fail because I used a powder eyeshadow that made a chunk of powder visible. After that mistake, I used a cream shadow and mixed it with a tiny bit of cream blush and foundation. It colored my eyebrows and I didn't spend at all because I just used what I already have.


The latest DIY I made was a tool. I recreated Sigma's Dry 'n Shape with a black garter, thread and a needle. I saw this DIY in another YouTuber, which is Secret Life of a Bionerd but she just hot glued it. I thick that might be easy to break so I just stitched the garter together.
Instead of spending PHP1,800 for the Sigma Dry 'n Shape, I just spent 50 bucks! :)


I know I've not posted DIY recently but I promise to post soon.
Please do watch out for my future Beauty DIY! :)


Wednesday, November 13, 2013

My 1st Giveaway! ♥


I started YouTube last July and I know I am a slow YouTuber that I just hit my 100th subscriber this month. As a give thanks to the viewers I will be having a giveaway. This is just a simple giveaway for you guys but I know it will help you in terms of applying makeup, and some random beauty care.

Here is the list of what I will be giving away:
Moist Skincare Whitening Lotion

♥ Olive Young Rice Moisture Mask & Arbutin White Mask

♥ Skin Food Rice Mask Wash Off & Platinum Grape Cell Essence


♥ Eyeliner Guide, Mascara Guide & False Eyelashes Helper Applicator

♥ Super Bandz Hair Tie


Only 1 lucky subscriber will win! :)

This giveaway became possible with the help of Elga De Shoppe or also known as Elga's Boutique. An online store owned by my sister. In conjunction to that, here are the rules:

a Rafflecopter giveaway
For additional points and another giveaway:
1. Repost their giveaway picture, hashtag #elgaraceto1k and tag 2 friends and me @ixadevera.

My personal giveaway will end on December 14, 2013, 12mn.
But Elga de shoppe's instagram giveaway will end when they reach 1k followers.

Wishing you all good luck and God bless!


Monday, November 11, 2013

Wet 'n Wild Mega Last Nail Color in On A Trip Review ♥

I am not a nail polish enthusiast and I don't really like painting my nails but I gave this one a try. When i paint or when I get my nails done, I always have them painted in dark blue or any neutral shade. On a Trip color is lilac and I think this is the only fun color I had on my nails.

Wet 'n Wild describes the Mega Last Nail Color as,
"Sophisticated, classic colors beautifully accent any look. Long-lasting, opaque color provides 5 days of chip-resistant wear. A revolutionary resin polymer system creates exceptional color adhesion to nails. This resilient polish is calcium and mineral fortified to rebalance and prevent nail discoloration. Comes with a unique, full-coverage brush that glides on smooth for one-stroke application. Toluene, phthalate, and formaldehyde free."


As for the application, it is easy to apply because of its brush. It isn't the usual circular type of brush but it is a wide flat brush that can fill up the entire nail in one swipe.

Also, one coat gave a good opacity that it doesn't need to have another coat. But as for me, I like thick coat of nail polish so I applied one more coat. I didn't also put a base and a top coat just to see how long it will last to my nails.
Yeah, I know. I do have short nails and I applied the color messily.

Usually, nail polishes I have on chips even on the first day of applying it. Some polishes I tried lasted just 2-3 days to have a major chip (even OPI, China Glaze and drugstore nail polishes). This one didn't. It only had a major chip on the 6th day. Just for reference, I do not really take care of my nail polish. I am a clumsy person in terms of nail colors, like I open things using my nails that may break it. This nail polish really amazed me because it stayed that long on my nails. Also, it isn't hard to remove like any other polishes that you have to rub hard just to remove it.
6th day: 1st major chip

In conclusion, I love this nail color and I would purchase other colors if I wanted to. I would definitely recommend the Wet 'n Wild Mega Last Nail Color. I also featured this in my October Favorites video in my YT channel.

Here's the link of the video: http://youtu.be/vXAlw7DV3ic